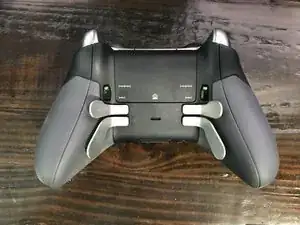
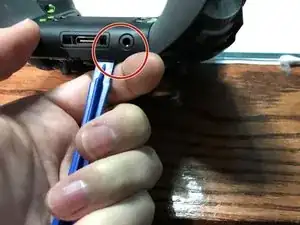
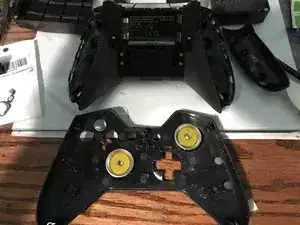
Introducción

  1. 3TJCZrq5ELWWAUFV
    3TJCZrq5ELWWAUFV
    BjyGV5CMDIeVhvmj
    • Puedes quitar los paneles laterales con una herramienta de palanca.

    • No es necesario quitar la goma. La goma de este mando ya estaba mal

  2. 1opju56P6EkrT4sb
    • Retira los 5 tornillos Torx Security Bit (TR9)

    all the T8 screws on my controller have a clear filling in them, WTF?!?!?

    Patrick Henry -

    all my T8 screws have a clear filling in them, WTF?!?!?!

    Patrick Henry -

    I've never seen that, I can't advise much other than scrapping it out with an xacto knife

    EasyAsABC123 -

    My screws have a tiny metal pin in the center. Looks like I need a TR8 bit, not a T8. This might be what you are mistaking for a clear filling.

    Steve McGinn -

    Thanks it might be TR8 i’ll update the guide

    EasyAsABC123 -

    While a TR8 will work, they’re actually TR9 screws on mine (Model 1698, X912908-004).

    Daniel -

    @isbelldl thanks, updated to specify TR9

    EasyAsABC123 -

    TORX TR8 worked form the ifixit kit

    KRISTIAN KALLAWAY -

    My anolog stick is lagging on my elite 1 controller. Can I remove a anolog module from a normal xbox 1 controller and then put into the elite 1 controller would it be compatible. I have all the soldering irons and stuff. It's only that I dont have any money and wanted to no if thay would work . Thanks guy appreciate your time kris

    kriswadd@hotmail.com -

  3. 1LhEeI3qiQhNkbHj
    1LhEeI3qiQhNkbHj
    LeGSVTi1qpxlxOu3
    rXKydWRn5yLpQJQJ
    • Haz palanca en el panel junto al puerto de 3,5 mm

    • Ten cuidado de no rasgar la cinta que se muestra en el siguiente paso.

  4. kBhSWTEhAPEVD5yA
    kBhSWTEhAPEVD5yA
    ZUcv6TdiGcYZVboE
    • Ten cuidado de no rasgar el cable plano.

    • Puedes levantar el conector para quitar la cinta fácilmente

    • Cable plano

    My connector did not look like this and popping it up broke it

    Amarokstar -

    please post a picture of the connector so we can update this, you also might have a newer revision of the motherboard

    EasyAsABC123 -

    Is there any way to replace that connector bar or maybe an alternative to keeping the contacts down on the ribbon if it’s broken?

    Joe -

    @joe you can try tape, or even hot glue (easy to remove with rubbing alcohol), that might hold it down. I wasn’t able to find the connector but i’m sure if you count the number of pins and measure it you’d be able to locate a replacement connector on something like mouser.

    EasyAsABC123 -

  5. xYndZmGjfDV2tAWL
    • Retira los 2 tornillos Torx (T6)

  6. o3HhKPLSRfiY6UWQ
    o3HhKPLSRfiY6UWQ
    XqgEF5JcGjS5tolD
    • Desoldar los 4 cables de cada lado, estos controlan las vibraciones y el RT LT

    If you are just replacing the main power board there is no need to desolder at this point. The main power board can be removed with the controller board still in place.

    Malc Foy -

  7. RsDGGXPEn1T4VlXm
    RsDGGXPEn1T4VlXm
    a1P53NN3INNRo4Qr
    • Tira hacia arriba desde el lado "superior" del controlador en la placa hermana.

    Hi,

    I would like to know if I could get from you a Motherboard . In case you don' t have it, where could I find one?

    Thank you

    Alejandro Expósito -

    Hi, I have 2 not working controllers (both 1698 and 1708). The 1708 broke the bumper switch, I manage to fix it but as always, postponed. So, can I either swap Xbox One Elite comtroller (1698) into Xbox One (1708) shell/housing or vice versa??

    Or can I mix both motherboard together so I can make one of them working?

    Fitifazrul Rahman -

    It might work…it might damage one of the boards but probably wouldn’t

    EasyAsABC123 -

    I would like to buy a motherboard, can you please stock some up?

    davi_t -

    I don’t work for ifixit, I don’t know if they see comments on a private made guide.

    EasyAsABC123 -

    I decided to toss all this stuff in the trash at this point as I am not going to spend +$50 on equipment and replacement parts to fix a $60 controller. But thanks for the educational manual all the same.

    KRISTIAN KALLAWAY -

  8. LtJWMGWVoWUxKMll
    • Estos pueden ser difíciles de desoldar. Lo mejor es usar un soldador de grado 650F, si lo tienes disponible. Si tienes problemas para desoldarlo con la soldadura vieja, agregar soldadura nueva facilita la eliminación de la soldadura vieja.

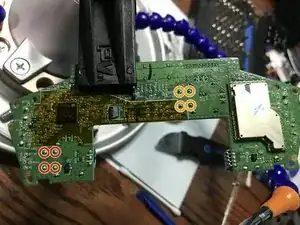
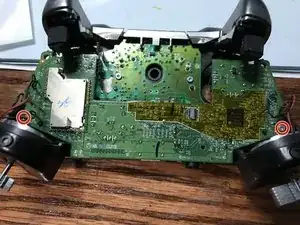
    • Desuelda los 4 pines que sujetan los pines en el stick analógico izquierdo.

    • Desuelda los 4 pines que sujetan el botón en el stick analógico derecho.

    Is that 650 C or F? Big difference between the two.

    The Stuff -

    fahrenheit not celcius.

    EasyAsABC123 -

  9. XUIXIDGuTuNHFQJ5
    • Se requiere un soldador de grado 650F. Si tienes problemas para desoldar estos componentes, agregasoldadura nueva para facilitar la extracción.

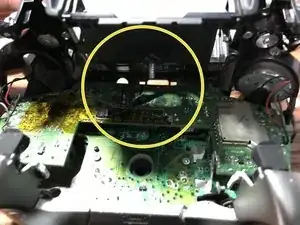
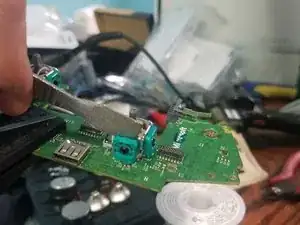
    • Primero, desuelda el stick analógico izquierdo.

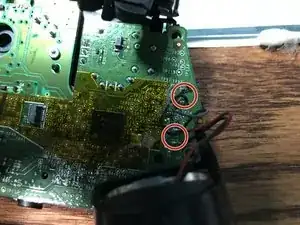
    • A continuación, desuelda los 6 pines del stick analógico derecho.

  10. nYg4TWhQTBAndFKi
    • Se requiere un soldador que pueda alcanzar un mínimo de 650F. Si tienes problemas para desoldar los sticks analógicos antiguos, agrega soldadura nueva para facilitar la extracción de los sticks analógicos antiguos.

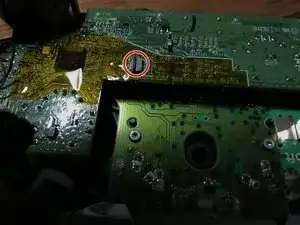
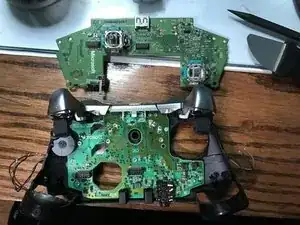
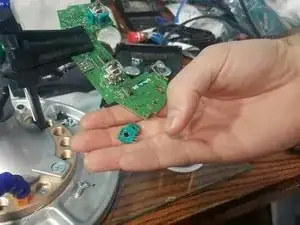
    • Desuelda el stick analógico izquierdo del controlador.

    • Desuelda el stick analógico derecho del controlador.

    Watt? Or is that a typo and it should say 650F again?

    Wesley Boynton -

    Thanks updated guide

    EasyAsABC123 -

  11. 3IWJOoknsk5WoUnn
    3IWJOoknsk5WoUnn
    cLR3CLXddkJNQeiC
    aVin16fDcDemWKHZ
    • Si tienes problemas para desoldar, estas son las dos cosas que puedes hacer para resolverlos.

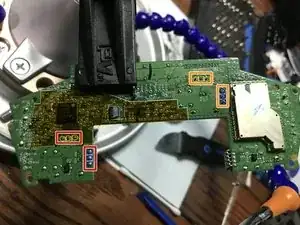
    • Puedes usar un destornillador para abrir las resistencias y luego quitarlas de la placa para permitir el acceso a los pines de tierra

    • Ahora, con tijeras, puedes cortar los pines y luego usar un soldador en ambos lados y quitar el pin cortado suavemente con unos alicates.

Conclusión

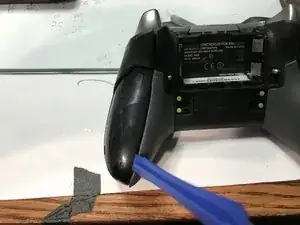
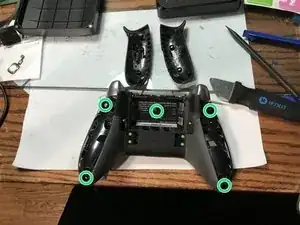
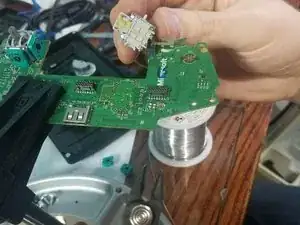
Para volver a armar tu dispositivo, sigue estas instrucciones en orden inverso.

EasyAsABC123

Miembro Desde 22/01/10

2273 Reputación

35 comentarios

I’ve replaced a thumbstick sensor on one of these controllers recently, and it doesn’t register movement like the other, original one. It can be described as the entire intended range of movement being compressed down into a very narrow band over the travel of the stick. The deadzone is quite large now, relatively speaking. Can this kind of behavior be attributed to a bad soldering job (all directions are recognized during tests), or is it perhaps just a bad sensor?

Brandon -

Bad solder job is unlikely, i’d assume the new joystick doesn’t have the same specs as the old one.

EasyAsABC123 -

i cant get the module out. I desoldered the pins but it seems like the module is glued onto the board? Tutorials doesnt show that part

Patrick “II JumPeR I” Korell -

It is just soldered in, hold the soldering iron the the pins and pull gently. If you pull too hard you might damage a solder pad, although it is unlikely.

I have a desolder vacuum gun and I still have the issue you are describing I'll be fixing an elite controller tomorrow so I'll record that and take more pictures to update this.

EasyAsABC123 -

@easyasabc

Would be great if you could do that :)

Patrick “II JumPeR I” Korell -

Hm after finally being able to replace the module im getting this now. The stick just drift to the right now :/ Do you know what could cause it? https://imgur.com/a/ghac5 im not moving the stick

Patrick “II JumPeR I” Korell -

Yes this is likely from a bad replacement, always buy multiple since they all come from china

EasyAsABC123 -

It can be a lot of different things that have gone wrong with the potentiometer in charge of that direction of control

EasyAsABC123 -

So you mean the module was bad? Because i bought two and both of them produced this :/

Patrick “II JumPeR I” Korell -

that’s what constant drift means if you unplug let go of both sticks and replug…that might fix it but i doubt it

EasyAsABC123 -

Do you know the part number for analog joysticks in the elite controller? There’s so many out variants out there and I don’t want to order crappy ones.

Nathan Araujo -

See this is my problem I don’t wanna get the crappy ones too and I don’t know if they even make one for just the Elite controller do they ?

Anthony Pulido -

the standard and elite controller share the same potentiometers, so do the xbox 360 controllers if i’m recalling right.

They are all cheap, they don’t put high quality pots in these controllers…the cheapest are normally just not tested as well meaning they might not be perfect out of the box

EasyAsABC123 -

So is this the fix when you’re joystick gets loose and how do you find the right joystick for the elite controller aren’t they for the original Xbox one controller and isn’t there a difference?

Anthony Pulido -

the standard and elite controller share the same potentiometers, so do the xbox 360 controllers if i’m recalling right.

EasyAsABC123 -

Do you have any video tutorials on the desoldering of an elite controller? Would love to see your method, its been tough for me.

Carlos Tolen -

I have this video which is of a normal xbox controller, i have a desolder gun though so it probably won’t be super beneficial.

https://www.youtube.com/watch?v=OyI_1AxP...

EasyAsABC123 -

Is there a site to buy the board pre built?

Player Unknown -

Not that i’m aware of, there are plenty of people you can ship your board to with what you want done to it though.

EasyAsABC123 -

my dude, it’s a potentiometer. Not a directional resister. That’s a made up term.

My dude

mookiez1590 -

it says potentiometers everywhere i don’t know why it had directional resistors

EasyAsABC123 -

My problem is that i tried desoldering but they won’t come of .the pins are so small does anyone have some ideas tho help me or maybe a link to the whole motherboard . Thx

Daniel boehnke -

try clipping the pins adding new solder to the joints…and then pulling the pins out with pliers while heating from the other side…these are through hole and might take more heat than you are used to. you might need a 700W soldering iron to remove them…clipping them off at the board will show you specifically which ones you haven’t desoldered though.

EasyAsABC123 -

Hi ive killed the Solder Pad of the right stick s Potentiometers.

Please can somebody Upload where i have to put wires on witch contacts?

This would be awesome.

Bernhard -

That is impressive, did you cut them somehow? You would have to really burn out the controller with the soldering iron to “damage” these with just a soldering iron. This diagram has a lot of the traces but i don’t know if it has the joystick traces http://www.acidmods.com/forum/index.php?...

EasyAsABC123 -

How much would u charge to do mine for me?

Derrick -

You should ask around at a maker space or find someone local to show you how to accomplish this. There are also plenty of youtube videos showing how to accomplish this.

EasyAsABC123 -

Hello,I just replace the left analogue 3D module of my Xbox one controller and I struggled a lot to remove the old one,with the new one up and down are working but left and right aren’t,I don’t know what went wrong,because I replace it a 3rd time because I thought the 3D modules wasn’t working well but the problem remains

odbaghi -

The board might be damaged or just the new joystick isn’t installed just right, i couldn’t really tell you without seeing it.

EasyAsABC123 -

Factory joysticks dont sit perfectly flush from the beginning, you can fit a razor blade between the board and the part, so dead spots are probably from a bad part, or relate to the motor skills of the operator.

Harold -

After the exchange, the left stick does not work when it is pressed. What can you do?

Dylofix _Ger -

Verify the soldering on the 4 smaller pins from the joystick those are what controls the button action of the joystick

EasyAsABC123 -

Hi there.

With this tutorial I managed to replace the entire Stick with a new one. Yet I experienced some odd behavior. The range of the stick is too big. Meaning with about 50% of physical stick movement I already am reaching full movement in test programms like gamepad tester. This is making the controller super sensitive and practically unplayable... :( Is there any fix? Thanks in advance

specialist109 -

Anyone have issues with de-soldering temperature? Trying to get the main stick out, but even at 400c (max temp on my iron) it doesn’t even budge.

John Nguyen -

Short answer: Unless you have an underpowered iron (>65w is enough); The problem is likely that you aren't using enough flux, or that your soldering tip badly needs to be replaced.

Long answer:
You are likely either not achieving good enough thermal transfer rate from your solder tip to the board (add new solder to the pins before starting to desolder, then add plenty of flux after it has cooled down so you don't just oxidize the new solder when desoldering) or your're not insulating the parts you don't want to heat up properly. Though if you've tried it at 400 degrees celsius the problem is very likely the first one, I seldom have to increase the temp on mine above 325 (I have a good deal of hand-soldering experience though) when desoldering, the one exception being when I need to repair parts that solder to the GND-planes of a PCB (then 350-365).

Best regards /Marc

Marc Thulander -