Introducción

Esta guía te muestra cómo cambiar el cable del controlador de la Xbox 360. Ten en cuenta que se necesitan habilidades mínimas de soldadura, ya que la placa de circuito del controlador puede dañarse permanentemente si no se maneja adecuadamente.

Antes de empezar esta guía, asegúrate de tener:

  • microdestornillador
  • soldador y alambre
  • mecha desoldadora
  • cable USB de repuesto
  1. AFLqxaNmYyBWmonv
    • Quita la etiqueta adhesiva del sello de seguridad de la parte posterior del controlador.

  2. 3sxRjqMFn4X1C2kH
    • Extrae los siete tornillos de la parte posterior del controlador.

  3. bhXnCVMMIb2S5XXG
    • Separa las carcasas delantera y trasera del controlador.

    • Usa un spudger o herramientas de apertura de plástico si es necesario.

  4. BPKmU2GOSsPVdkkJ
    • Extrae los interruptores de la placa frontal delantera.

    • No desconectes los interruptores de la placa de circuito.

    Why shouldn't we disconnect the tumblers?

    If there's an important reason to leave the tumblers attached for this repair, please explain it.

    Do they actually need to stay on for this particular repair to work correctly? Or do you just feel that disconnecting them is an unnecessary extra step?

    I've taken my controller apart before to replace the joysticks & paint the case.

    I unplugged & replugged the tumblers with no problems. In fact, I found disconnecting them made the pcb much easier to handle without them attached & flopping around.

    Plus it protects the wires from getting broken from unnecessary twisting & flopping while handling the pcb.

    I have even seen controllers that the owner removed the tumblers entirely (to lighten the weight of the controller) & the controller was perfectly functional (sans vibration effect) without them.

    So please explain why you’re saying “don't disconnect” them.

    Nerfbomb -

    I second this, they’re plugged, there is no physical reason not to detach them and prevent desoldering their contacts.

    Ed B -

  5. dP3sWSVnWYrGjIOp
    • Quita la placa de circuito de la carcasa frontal con los interruptores aún colocados.

    • Ten cuidado de no quitar los botones de la placa frontal para evitar posibles complicaciones.

  6. CVRpg13CLgKQHSs4
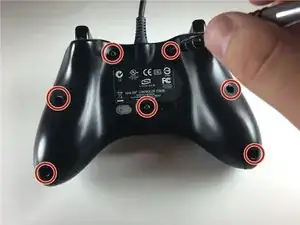
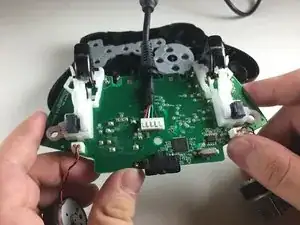
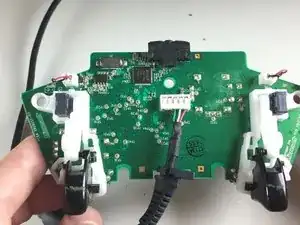
    • Coloca la placa de circuito sobre una superficie no conductora, con los interruptores hacia arriba y el cable USB hacia ti.

    • Las superficies estáticas pueden dañar la placa de circuito.

  7. EgUv3DBkThJLki6u
    • Enciende el soldador.

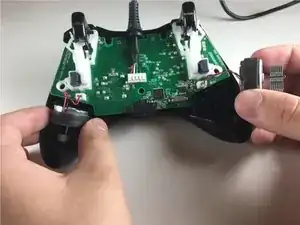
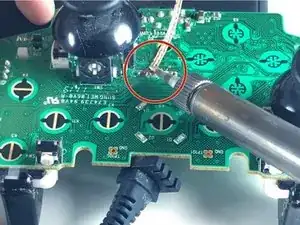
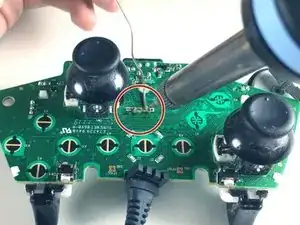
    • Separa la soldadura (que está directamente a la derecha del interruptor izquierdo) de los cuatro nodos lineales, usando la mecha para desoldar y el soldador.

    • La placa de circuito debe estar en la misma posición que en el paso 6.

    • El uso inadecuado del soldador puede causar lesiones.

    • El contacto directo entre la placa de circuito y el soldador puede dañar la placa.

  8. eDh4QhHGYNnlhXqn
    eDh4QhHGYNnlhXqn
    DOvMNBIDZWrOmTr3
    • Quita la carcasa del cable del lado opuesto de la placa de circuito.

    • No ejerzas una fuerza excesiva en la placa de circuito o se romperá.

  9. 3pLLYv2G6OKqiK1r
    3pLLYv2G6OKqiK1r
    YEuBT3FW4wARtXHt
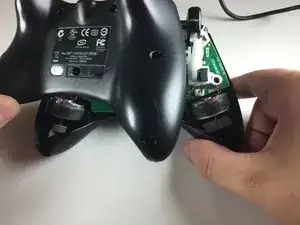
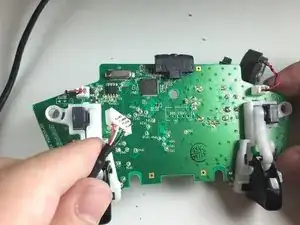
    • Conecta la nueva carcasa y el nuevo cable a la parte posterior de la placa de circuito. El cable debe salir por la parte superior del controlador.

    • El orden de los cables (de izquierda a derecha) es: negro, verde, blanco, rojo.

  10. npP5pB4eebZSHojn
    • Repite el paso 6.

  11. UmkCulf1ZxBMaMh5
    • Vuelve a soldar los cuatro nodos (de izquierda a derecha) con el soldador y el alambre para soldar.

  12. gFqAU2UDaTMSGn6Z
    • Vuelve a montar la Xbox 360 y ¡a jugar!

Conclusión

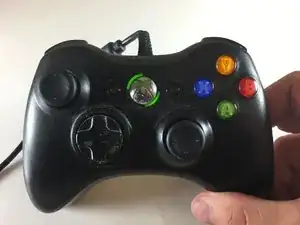
Siguiendo estos pasos, podrás cambiar el cable USB del controlador de la Xbox 360. Con suerte, esta guía te será útil y alargarás la vida útil del controlador de la Xbox 360.

Sam Bahl

Miembro Desde 22/09/15

867 Reputación

13 comentarios

Where did you bought the replacement wire/cord?

gatchie24 -

The first one took me 1 hour and half, the second one 20 minutes. Here are some comments.

- It was very hard to unsolder the defective USB plug. I had to use a high temperature on the solder iron, and pull the plug from the other side as I was alternating between the 4 pins.

- There are 4 pins but 5 holes on the board. Make sure to check what one is useless before unsoldering.

- It is best to dismount the controller face down and to keep it that way. The face plate has all the buttons and they will fall if you turn it upside up.

Jean-Yves Tinevez -

What happen if I disconnect the tumblers

Xander Redstorm -

Thank you for this explicitly post.

Albert Einstein -

добрый день! могут ли значения конденсатора c3 и c6 этого контроллера? и ссылку, если это возможно.

Dmitry “Mickey” Fomin -

Good day! Can the capacitor values C3 and C6 of this controller? And a link if possible.

Dmitry “Mickey” Fomin -

i found it incredibly hard to remove the USB plug from it, especially because my controller (though the same Microsoft one) had a silver box soldered just below that point blocking off that side to solder with, i had to switch to my larger solder because the little one i use didn’t seem to get hot enough. spent nearly 2 hours tying to do this and plug it in and doesn’t work, think might have damaged to the PCB too much trying to remove the thing (its only a little singed) just gonna have to get a new controller instead it seems

thiscatsmells -

Maybe i’m a little late but if you want to unplug that white plastic square you should heat the solder and use a solder sucker and then try to pull it from the other side

Santiago Mondragón G -

Do I need the USB replacement cable? Can I not just cut the end off a USB cable I have lying around and solder that to the board?

Stuart Coutts -

You can use any cable

Santiago Mondragón G -

Can I use a normal Xbox 360 controller cable for a windows 360 controller?

Sugar Bomb Gaming -

after replacement cable, my controller blinks three times and off… then not recognize on pc.. any solution?

rafuleto i j -