Introducción

Prerrequisito

  1. NSogTWXkaACgjgqK
    • Quita los dos tornillos T10 Torx (9 mm) que fijan el soporte superior del disco duro a la carcasa externa.

    Mine does not look like this AT ALL

    jinnifer douglass -

  2. 16K61KZCLZKDuEXP
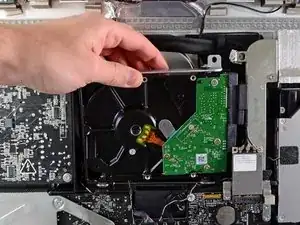
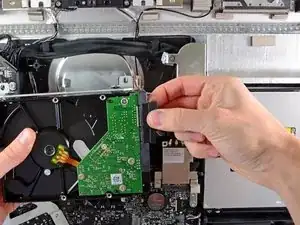
    • Rota el disco duro ligeramente para sacarlo de la carcasa externa, y levántalo de sus clavijas hacia la sección superior del iMac.

    • Ten cuidado de no tocar la tarjeta AirPort mientras quitas el disco duro de su ranura.

    Mine seems to still be connected by something else on the other side, and I cannot remove it…

    jinnifer douglass -

  3. QOmONKbiPP5gUKAU
    QOmONKbiPP5gUKAU
    QN4VZmhyLibH2Dbt
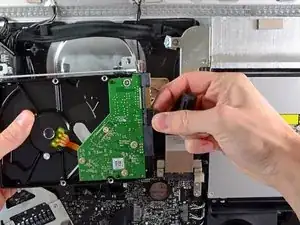
    • Desenchufa el cable de datos SATA y el conector SATA de sus respectivos conectores, tirando con cuidado de cada uno de estos cables de forma que los alejes del disco duro.

    J’ai un 3ème câble de branché sur le disque dur ?

    Delon -

    My iMac HDD have 3 ports in the back, SATA data, SATA power and a small one that looks like jumpers pins. When i removed the HDD there was a cable in it. Does anyone know what it is? I bought a new HDD and this port is slightly different. Thanks in advance.

    Rodrigo -

    It is a sensor, it is used by the fan control. I did not connect it because my SSD does not have this extra port. So after the iMac reboot, everything worked but the fan was always on (noisy!). I solved this issue by installing a small soft called ssdfanctrl in order to control the fan manually. All good now.

    yeshelolo -

    Pour le remontage, pensez à ajouter l’iMac Intel 21.5" and 27" Mid 2011 SSD Temperature Sensor’

    Une fois cette installation entre le disque et la nappe d’origine, vous pouvez remonter votre iMac.

    Gui -

Conclusión

Para volver a montar tu dispositivo, sigue estas instrucciones en orden inverso.

Walter Galan

685928 Reputación

0 comentarios