Introducción

  1. CR4uCijdW1OugLYO
    CR4uCijdW1OugLYO
    H1FdIigqyDXVftPq
    juxJIpQPuYHqjCn5
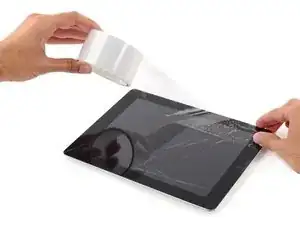
    • Si el vidrio de tu pantalla está agrietado, mantenga contenidas las roturas adicionales y evita daños corporales durante la reparación pegando el vidrio con cinta adhesiva.

    • Coloca tiras superpuestas de cinta de embalaje transparente sobre la pantalla del iPad hasta cubrir toda la cara.

    • Esto mantendrá los fragmentos de vidrio contenidos y proporcionará integridad estructural al hacer palanca y levantar la pantalla.

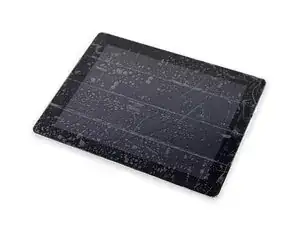
    • Haz todo lo posible por seguir el resto de la guía como se describe. Sin embargo, una vez que se rompa el vidrio, es probable que continúe agrietándose mientras trabajas, y es posible que debas usar una herramienta de palanca de metal para sacar el vidrio.

    • Usa gafas de seguridad para proteger sus ojos y ten cuidado de no dañar la pantalla LCD.

  2. MxqCUTyahFyGCMUM
    MxqCUTyahFyGCMUM
    dhC3co6rmldN4VR3
    • El iPad que se muestra en las fotos puede verse ligeramente diferente de su iPad, pero el procedimiento es el mismo.

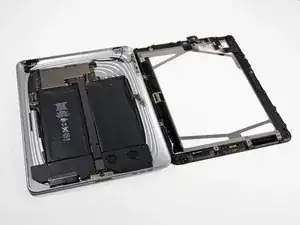
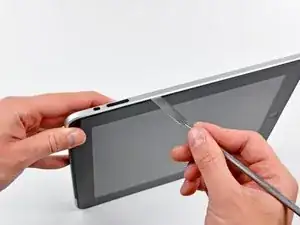
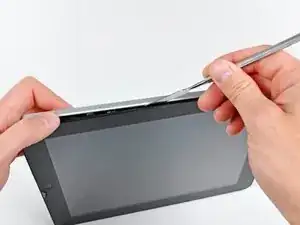
    • Inserta un spudger de metal entre el borde derecho del ensamblaje de la pantalla y el ensamblaje del panel trasero.

    • Gira el spudger lejos de ti para soltar las pestañas a lo largo del borde superior de la pantalla.

    Ok, a word of caution that can't be overstated. The off screen switch, the lock swith, and the volume switch can all be broken easily. I would stay away from this area completely. The bracket on the off switch is tack welded and can be broken. The volume/lock swith can be malformed to become unusable. So avoid the area and you will be better off.

    Carl Rossi -

    Most of the spring clips mounted to the digitizer panel (sandwitched between the LCD display mount tabs and digitizer frame) are guaranteed to break. I recommend just purchasing a set (I found on one Amazon for less then $6). With that said, even though I broke most of mine while removing the glass panel/frame assembly, I was able to remount the glass. It seems fairly secure, but I'm going to put the iPad (3G/Wifi) in a case, anyway.

    stevetsi -

    Pas besoin de pistolet a chaleur, il faut juste faire sauter les clips qui maintiennent l'ensemble écran et LCD. Bien commencer par la droite, car se sont juste des picots en plastique a faire sauter par dessus le rebord en alu, puis soulever la partie du bas en cassant les 4 clips ( pas moyen de les garder entier). Ensuite la partie gauche (avec 6 clips) se détachera facilement. La partie haute n'est pas éclipser mais retenus par un cable.

    tibo -

    Yes, most of the clips break easily, but I was able to reassemble the iPad by putting the left side in first at an angle, and then snapping in the rest of it. Even though most of the clips break, it still holds together pretty tight.

    Peter Hillman -

    not all clips break, and there are so many clips that despite breaking 2-3 clips it still fitted in nicely, if you do not have a metal spudger you can use any pack of screw drivers whose other end looks like the metal spudger, that’s about it, as far the instruction goes they are good for battery replacement.

    ztauseef -

  3. T3kjASSHLhfC6JOI
    T3kjASSHLhfC6JOI
    SIplIyVGNK1QC161
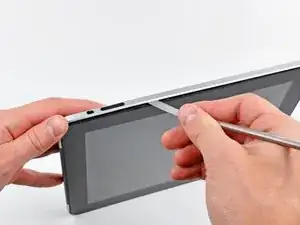
    • Inserta un segundo spudger de metal entre el borde superior del ensamblaje de la pantalla y el ensamblaje del panel trasero para evitar que las pestañas vuelvan a encajar en su lugar.

    • Haz palanca en el ensamblaje de la pantalla para separarlo del panel posterior.

  4. PEMgUMQuViASOYwo
    PEMgUMQuViASOYwo
    PmVL6K4PfQUYuEnC
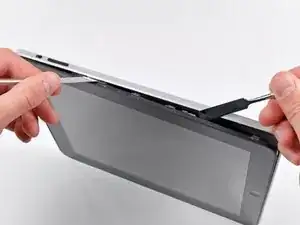
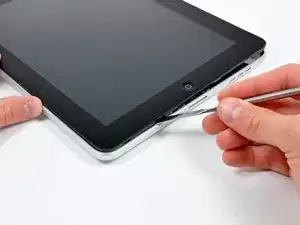
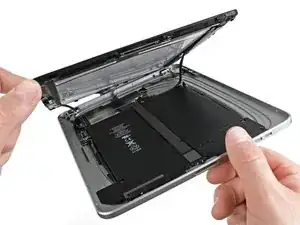
    • Continúa haciendo palanca en el ensamblaje de la pantalla para separarlo del panel posterior a lo largo de los bordes inferior e izquierdo del iPad.

    • Ten mucho cuidado al acercarse al borde superior del iPad. El cable plano del digitalizador se encuentra cerca del borde del panel trasero y puede dañarse fácilmente.

    Be very careful as the left side has plastic pins that go into the cover, the right side and bottom have metal clips which break easily.

    After unlocking the left side, pull away from the right side, as to save the metal clips.

    Neven Dilkov -

    During reassembly, it can be difficult to get the clips back into the body. I found that I had to put two (sturdy) metal spudgers on either side of the lower-right clip in order to gain enough space to get the clip into the body. Even then it required a fair amount of force (obviously not so much as to damage the display).

    cgkemper -

  5. XTsZrsSq6rdV63XG
    • Levanta el ensamblaje de la pantalla para separarlo del ensamblaje del panel posterior por el borde inferior.

    • No levantes excesivamente el ensamblaje de la pantalla del resto del iPad, ya que un cable de antena frágil con muy poca holgura aún conecta los dos componentes.

    There are four black angle metal foil corner pieces that just fall out of the case. They are about 4 mm long and 2mm on each leg. Have no clue what they do or where they go.

    Carl Rossi -

    That's probably broken Metal Display Clips. Easy to replace, but you'll need to purchase a set of new clips. Luckily, they're not expensive :-)

    orb -

    The display data cable may be glued into place along the right and top side of the right battery. You should use an iPod opening tool to pry it away from the adhesive. This will allow you to get a wider opening between the display and iPad body in order to access and remove other cables.

    cgkemper -

    The photo above is the Wi-Fi version because the cellular communication board is missing in the photo. As I lifted the display, following the instructions, one of the cellular antennas snapped right out of the copper connector exposing bare wire. No big deal because it is an iPad 1 and no one would ever use cellular with an original iPad anyway. Not these days. But be very careful lifting the display because the antenna wires for the cellular board are very short and break easily.

    Peter Hillman -

  6. 2WFnGCBH2T3Uc6h4
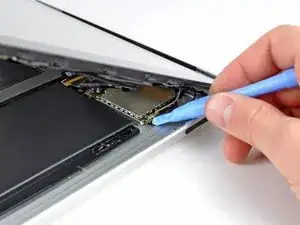
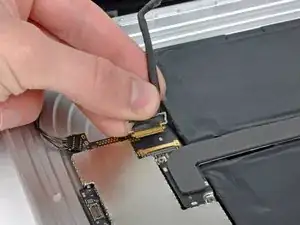
    • Usa el extremo plano de un spudger para levantar el conector de antena más cercano a la parte inferior del iPad de su enchufe en la placa de comunicaciones.

    Whats this antenna for? What is I accidentally tore it out? what will it affect?

    Laith -

    This is the GSM antenna cable connector.

    orb -

    did u find out what it did as I pulled the whole connector socket off can this be repaired

    dods -

    The antenna cable is easily broken when separating the screen from body.

    The whole antenna can be purchased for about $5 new on eBay.

    mpaint -

    Is there a tutorial? Mine broke and I did buy part. However, only thing I find is how to replace lcd. Just need how to replace 3G antenna.

    Marvin Dizon -

    I just need how to replace 3G antenna. Is there a tutorial? Mine broke and I did buy part. However, only thing that I find online is how to replace lcd.

    Marvin Dizon -

    There are 2 small cable with golden connector plugged into the sockets,

    unfortunately the lower one the cable and golden connector is broken when I move the display assembly off, what shall I do to fix it:-(

    oliveryb -

    Some know the function of these 2 cable? My lower cable broken with the golden connector...

    oliveryb -

    Mine broke and I simply soldered a new one on the bottom part of the old one, where the plastic wire cover ended. It worked. :)

    jessamy99 -

  7. IUEnPwHYdRl15lCH
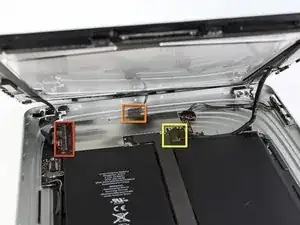
    • En los siguientes pasos, desconectará los tres cables que conectan el ensamblaje de la pantalla a la placa lógica. Los cables son para los siguientes componentes:

    • Digitalizador

    • Sensor de luz ambiental

    • Cable de datos de pantalla

  8. Osn5Mjog5LhnLRH2
    Osn5Mjog5LhnLRH2
    YcGdCmJXbExa2ke5
    Qr1fOvjrj4WeIvfJ
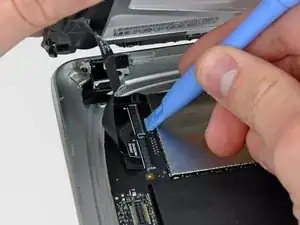
    • Usa el borde de una herramienta de apertura de iPod para levantar las solapas de retención que sostienen los cables planos del digitalizador en sus enchufes en la placa lógica.

    • Asegúrate de levantar la solapa de retención, no el enchufe en sí.

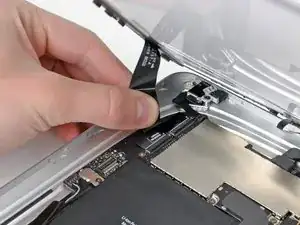
    • Saca los cables planos del digitalizador de sus zócalos.

  9. Tyf3AERL2ERFsQKy
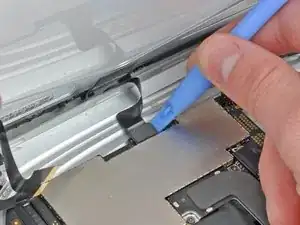
    • Utiliza una herramienta de apertura de iPod para quitar el conector del sensor de luz ambiental de su zócalo haciendo palanca suavemente hacia arriba.

  10. ddRTUuGDKNBk2bh6
    ddRTUuGDKNBk2bh6
    21FKNBGre42J6UWA
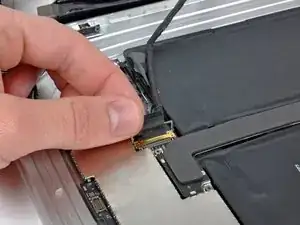
    • Desconecta el cable de datos de la pantalla de la placa principal levantando el retenedor de metal por su lengüeta de plástico negra.

    • Extrae el conector del cable de su zócalo.

    • Tira del conector paralelo a la cara de la placa lógica.

    For iPad Wifi Users, there is a ‘3D Antenna’’ cable that also needs to be removed. This is not covered in this tutorial. Here is a YouTube link to that covers this procedure. https://youtu.be/iD8kGSD5r0A

    Amanda May -

  11. TM1PHArEjFrxUOCp
    • Retira el ensamblaje de la pantalla del ensamblaje del panel posterior.

Conclusión

Para volver a montar su dispositivo, siga estas instrucciones en orden inverso.

Andrew Bookholt

578639 Reputación

0 comentarios