Introducción

Usa esta guía para reemplazar una pantalla rota (también conocida como ensamblaje de pantalla o panel frontal) en un iPad Pro de 10.5 ”. La pantalla consta de un panel táctil de vidrio o un digitalizador fusionado a una pantalla LCD. Este conjunto completo debe reemplazarse como una sola unidad.

Ten en cuenta que el escáner de huellas dactilares en el botón de inicio está emparejado con la placa lógica del iPad. Para mantener la funcionalidad de Touch ID después de la reparación, debes conservar el botón de inicio original y transferirlo a la nueva pantalla como se indica a continuación.

Esta reparación puede solucionar problemas como un digitalizador de vidrio roto, una pantalla táctil que no responde o una pantalla LCD rota.

Necesitarás adhesivo de repuesto para volver a unir los componentes cuando vuelvas a montar el dispositivo.

  1. otaRXAqJBHRfjpZL
    • Un adhesivo fuerte mantiene la pantalla en su lugar. Para separarlo, primero deberá calentar y suavizar el adhesivo con un iOpener, secador de pelo o pistola de calor.

    • Es posible que deba volver a aplicar calor repetidamente durante este proceso para evitar que el adhesivo se enfríe y se endurezca.

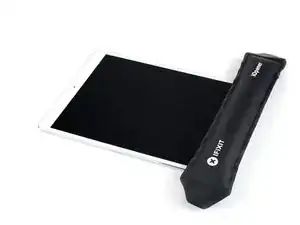
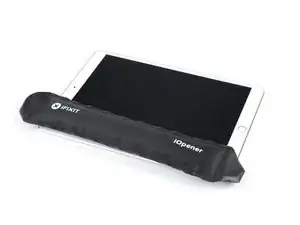
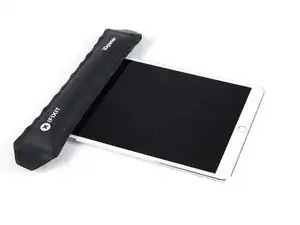
    • Prepara un iOpener y colócalo en el borde inferior de la pantalla del iPad durante unos dos minutos.

  2. dXwytgcbeMBtyPIK
    • Si la pantalla de su iPad está muy rajada, usa protección para la piel y los ojos. Cubre la pantalla con una capa suave de cinta de embalaje transparente para contener los fragmentos de vidrio y ayudar a que la ventosa se adhiera. Alternativamente, usa un trozo de cinta fuerte (como cinta adhesiva) y dóblalo como si fuera una asa.

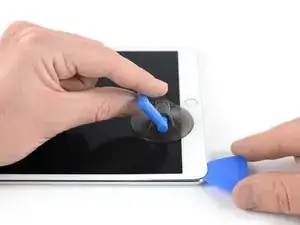
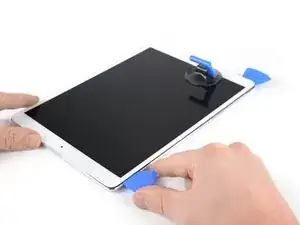
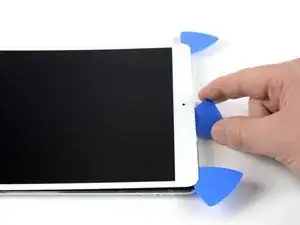
    • Coloca una ventosa junto al botón de inicio del iPad y presiona hacia abajo para crear un sello.

    • Para obtener el máximo apalancamiento, coloca la ventosa lo más cerca posible del borde sin pasar del borde de la pantalla.

    • Si deseas utilizar el Anti-Clamp, una herramienta que diseñamos para facilitar el procedimiento de apertura, sigueesta guía.

    • Tira firmemente hacia arriba de la ventosa para crear un pequeño espacio entre el panel frontal y la carcasa trasera.

    • No tires con demasiada fuerza o podría romper el vidrio. Si es necesario, aplica más calor para suavizar aún más el adhesivo.

    • Una vez que hayas abierto un espacio suficiente, inserte una púa de apertura en el espacio.

    i used a proper suction tile puller (small one from DIY store used to hold bathroom tiles) to lift the screen off after heating around the edge using a heat gun. Be careful - It didn't damage anything. The tiny suction things that come with those iPhone kits are not strong enough for this. The one in picture might be good, but looks similar to the kits ones that have key ring.

    Robert Lord -

    The suction cup that comes with the iPad battery replacement is plenty large enough and strong enough.

    CAUTION, do not push the picks in more than a the width of the replacement screen adhesive strips. You will damage the $200 screen, maybe break the glass. The screen is multiple layers and the picks can get in-between the layers if you push too far in. I got into trouble at the lower left corner. After getting the screen loose, I found that I only need a 2-3 millimeters on the sides and bottom, and four or five millimeters in the corners.

    Gene Torrey -

  3. HRYjnydwI5uHt12k
    HRYjnydwI5uHt12k
    2nxd5mrkce3UfC1r
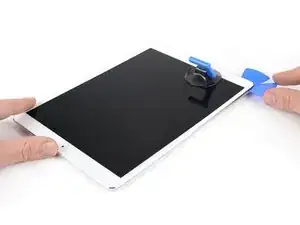
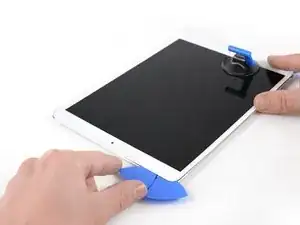
    • Corta el adhesivo debajo de la pantalla deslizando la púa a lo largo del borde de la pantalla, hacia la esquina inferior izquierda.

    • Deja la púa en su lugar temporalmente para evitar que el adhesivo se vuelva a sellar.

    Be super carful at the sides! If you insert your pick more than ~2mm, you will separate your display and front glass.

    voidfish -

  4. IDX6WsfJwQGPK1hD
    IDX6WsfJwQGPK1hD
    woVkXQtjng5taXfv
    CX5pQLbDVpljSlel
    • Aplica calor al borde izquierdo del iPad durante unos dos minutos, o hasta que esté un poco demasiado caliente para tocarlo cómodamente.

    • Si es necesario, vuelve a calentar su iOpener durante unos segundos o hasta que esté demasiado caliente para tocarlo. Ten cuidado de no sobrecalentar el iOpener o podría explotar.

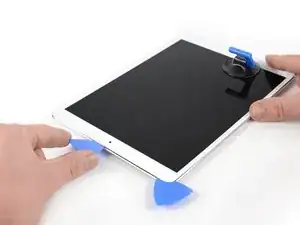
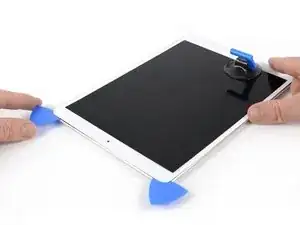
    • Inserta una segunda púa de apertura en la esquina inferior izquierda del iPad.

    • Desliza la segunda púa de apertura a lo largo del lado izquierdo de la pantalla para separar el adhesivo debajo.

    • Deja la púa de apertura insertada cerca de la esquina superior izquierda del iPad para evitar que el adhesivo se vuelva a sellar.

  5. Xsv3FIGGDpg2cySF
    • Aplica calor al borde superior del iPad durante unos dos minutos o hasta que esté un poco demasiado caliente para tocarlo cómodamente.

  6. iaIrQdhTPk3NQkBo
    iaIrQdhTPk3NQkBo
    5MDrFiJpRxgYtktW
    rZvTbO5Akf3ef1fF
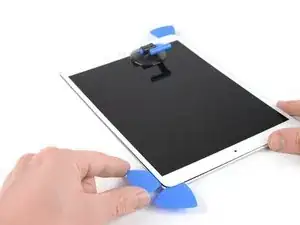
    • Inserta una tercera púa de apertura en la esquina superior izquierda del iPad.

    • Usa la púa de apertura para cortar el adhesivo debajo del borde superior del iPad deslizándolo hacia la esquina superior derecha.

    • La cámara frontal está ubicada justo en el centro del borde superior del iPad y puede dañarse si la púa se inserta demasiado. Solo inserta la punta de la púa de apertura cuando corte cerca de la cámara.

  7. NcHeiicA1BxMtSMG
    NcHeiicA1BxMtSMG
    2nq2lKnxklD4SEqb
    FyR4ypp5WTIbhUo3
    • Aplica calor al borde final derecho del iPad durante unos dos minutos, o hasta que esté un poco demasiado caliente para tocarlo cómodamente.

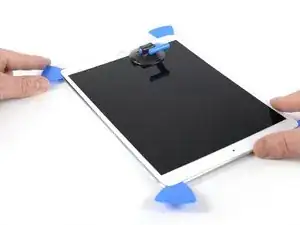
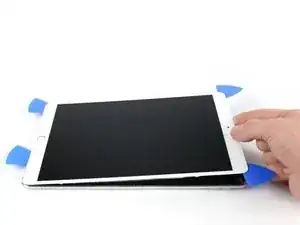
    • Inserta una cuarta púa de apertura en la esquina superior derecha del iPad.

    • Desliza la púa de apertura hacia la esquina inferior derecha para cortar el adhesivo.

    • Desliza la púa de apertura alrededor de la esquina inferior derecha, haciendo una pausa para aplicar más calor si es necesario, y corta el adhesivo restante en el borde inferior, pero deténte antes de llegar al botón de inicio.

    We must be very careful when we are prying left and right size bezel to peel off the screen as there very little gap between edges and LCD. Slightly inside push can crack LCD. We need to pay full care and raising edges very very slowly.

    iRepairMan -

  8. yNLpdqy3o1k2mXRL
    yNLpdqy3o1k2mXRL
    IGBVYHPJbbyL5okD
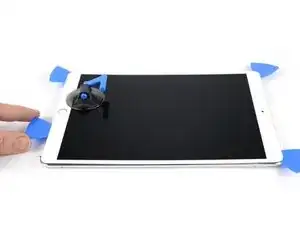
    • Inserta una quinta púa de apertura en la parte superior del iPad cerca (pero no directamente) de la cámara frontal.

    • Gire suavemente la púa para separar el ensamblaje de la pantalla del iPad.

    • ¡No intentes quitar la pantalla por completo todavía! Todavía está conectado a la placa base del iPad.

    • Si es necesario, aplique más calor y / o corte cualquier adhesivo restante que evite que la pantalla se separe.

  9. ocbIAZjbSbxccEWF
    ocbIAZjbSbxccEWF
    ZXh6TyUUb4CQX1wM
    ExGEFNSRgrxMVNIy
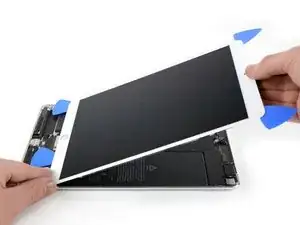
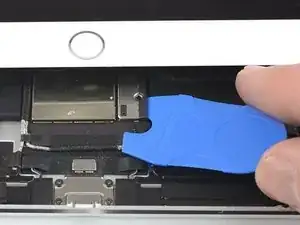
    • Levanta el ensamblaje de la pantalla desde su borde superior y deslízalo con cuidado hacia arriba (hacia la cámara frontal y el conector para auriculares), hasta que el tornillo que sujeta el conector de alimentación de la batería se vea en la parte inferior.

    • No levantes la pantalla más de 70 ° o podrías dañar los cables planos conectados.

    How do you go about getting to this battery connector as it is covered by a large metal shield above the logic board, if you do not disconnect the battery you risk frying the back light.

    Ayden McCormack -

  10. 4rXEwLDSrwuJsswL
    4rXEwLDSrwuJsswL
    neY1rxtpUctU1N3T
    • Quita el tornillo Phillips de 1.9 mm que fija el conector de alimentación de la batería.

    • A lo largo de esta reparación, mantén un seguimiento de cada tornillo y asegúrate de que vuelve exactamente al lugar de donde salió para evitar dañar tu dispositivo.

    What size Phillips bit?

    Josh Heilik -

  11. 4ouBh4GC2IOhyKNR
    4ouBh4GC2IOhyKNR
    5VpvOTBpSOqCXNgw
    PsWasEsoNUIanBMK
    • Estas fotos muestran el aspecto del conector de la batería debajo de la placa lógica. Utiliza estas fotos como referencia mientras desconectas la batería de forma segura.

    • Fíjate en que el conector de la batería tiene muelles en voladizo en la placa lógica que presionan contra las almohadillas de contacto de la batería. Como tanto la placa lógica como la batería están pegadas, tendrás que deslizar algo fino y flexible entre los puntos de contacto para desconectar la batería.

  12. 2e3jiUVhPCTeK3V2
    • Ten cuidado cuando aísles la batería utilizando un bloqueador de baterías. Los contactos de la batería se doblan o rompen fácilmente, lo que provoca daños irreversibles.

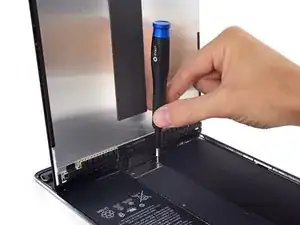
    • Para desconectar la batería, desliza una punta de un bloqueador de baterías o la punta de una púa de apertura bajo el conector de alimentación de la batería para asegurar que el circuito de alimentación se interrumpe.

    • No empujes el bloqueador de la batería por debajo del conector con una fuerza excesiva. Si tienes problemas para colocar el bloqueador de baterías debajo de la placa lógica, puedes intentar utilizar una carta de juego para desconectar la batería.

    • Lo ideal es que el bloqueador de la batería o la carta de juego se deslicen por debajo de la placa lógica sin encontrar ningún bloqueo.

    • Deja el bloqueador de la batería en su lugar mientras trabajas.

    I found it very hard to fit something under the battery power connector. I did not have a battery blocker, so I tried a playing card. I was not able to slide it between the springs. The section of the battery power connector, above the cantilever springs, did not seem to want to give at all, like in the picture above. If other people had success, I would love to hear how.

    hdh607 -

    I didn’t have success either, but i kept myself grounded, and avoided battery contact as much as possible.

    Amber Wooldridge -

    I used a playing card cut to shape. I had to make a couple, to try a few times.. It does go in eventually. Not deep, but enough to break connection. You can test by trying to switch on iPad.

    Robert Lord -

    It took some time but I was able to get it under the back part and slide it forward.

    Barbara Nelson -

    You must disconnect the battery before plugging the new screen. I think i didn't break the circuit in first attempt and shorted the screen, the result was half of the screen didn't work. I used a playing card. Second attempt was successful with new screen.

    Robert Lord -

  13. vuHXR5SLK1ppwfYQ
    vuHXR5SLK1ppwfYQ
    rohBSEFOJRJTRUcZ
    lPR1DjbIaXn1OdBK
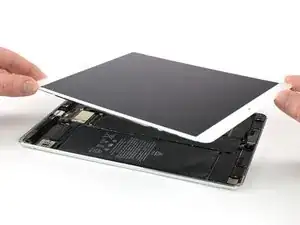
    • Levante lentamente la pantalla desde su borde superior, teniendo cuidado de no tensar los cables planos conectados.

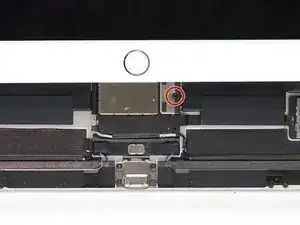
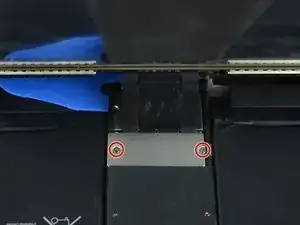
    • Quite los dos tornillos Phillips de 1,3 mm que sujetan el soporte de la cubierta del conector de la pantalla.

    • Es posible que deba inclinar ligeramente el controlador para evitar tensar los cables planos.

    • Retire el soporte de la cubierta del conector de la pantalla.

    Here it is very precocious steps to do. Flx cables to connectors are small in size and we cannot lift the display vertically. Therefore, we may struggle to unscrew the metal shield. We need to use smaller size of philip screw driver or place vertically the display to create enough gap between philip screw driver and the cover bracket. Similarly, when we are replacing new display we need to be carefully connect four flex cable with connectors with logic board.

    iRepairMan -

    agree, with re-assembly very tiny screws and awkward positioning, the back two cables pop off if not careful.

    Tom McGrath -

    I did this step using just the tip of the PH000 screwdriver, it made it much easier to get my hands into the small space, the replacement screen from ifixit had tighter cables that I was not comfortable stretching out to go to a 90* angle to screw back on. Make sure your tip is magnetized for best results :)!

    Amber Wooldridge -

  14. eFMfF6wqyCeBKRSU
    eFMfF6wqyCeBKRSU
    AQUlSPXnIfQFunMv
    quIQSO3BZ4g5PHqS
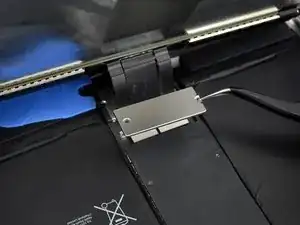
    • Usa un spudger para desconectar los dos conectores flexibles de la pantalla visible haciendo palanca suavemente hacia arriba de sus enchufes.

    • Para volver a colocar los conectores a presión como éste, alinea con cuidado y presiona hacia abajo en un lado hasta que encaje en su sitio, y luego repite en el otro lado. No presiones en el centro. Si el conector está mal alineado, las clavijas pueden doblarse y causar daños permanentes.

  15. rLEFxLicwMOpGHhK
    rLEFxLicwMOpGHhK
    TAwItumI5lUCWasR
    FBQrmOyUp3ST3UwV
    • Debajo, encontrará dos conectores de cable de pantalla adicionales.

    • Usa tu spudger para levantarlos suavemente y desconectarlos.

  16. kYoe4hwvKgs3PFDe
    • Retira el ensamblaje de la pantalla.

    • Durante el reensamblaje, antes de instalar una pantalla, retira cualquier adhesivo restante del iPad y limpia las áreas pegadas con alcohol isopropílico de alta concentración (90% o más) y un paño sin pelusa. Esto ayuda a preparar el iPad para el adhesivo fresco y asegura que se adhiera correctamente.

    • Si planeas reinstalar su pantalla existente, retira cualquier adhesivo restante de la parte posterior y limpia las áreas adheridas con alcohol isopropílico.

    • Prueba las funciones de su iPad e instale tiras adhesivas precortadas en la parte posterior de la pantalla con nuestra guía de aplicación de adhesivos para pantallas antes de sellarla.

    Definitely test your iPad’s functions before sealing it up. I needed to reopen the display to reconnect the display connectors in order to have the display functioning properly. As a result, the adhesive strips did not work as well and I needed to tape some of the edges closed with a small section of strong clear packing tape.

    hdh607 -

    I stuck the adhesive to the chassis first. That was messy because the plastic that covers the adhesive seems to be for screen side first. So you end up exposing both sides and those collect dust. I now realise you're supposed to put the adhesive on screen first. Not sure if it would have made much difference in the outcome (mine screen is not stuck in some places).

    Robert Lord -

  17. rPdohLwItdN6RI6Z
    • Usa tu iOpener o secador de pelo durante aproximadamente un minuto para calentar el área del botón de inicio a fin de ablandar el adhesivo que asegura los componentes del botón de inicio.

  18. iCSpM1FBTRcFxgAb
    iCSpM1FBTRcFxgAb
    pJrZRrtCgXpoxZv4
    GTbUaIdg2hENsCiU
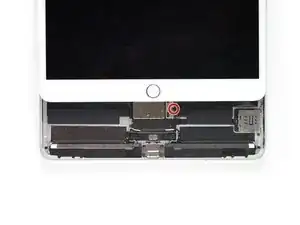
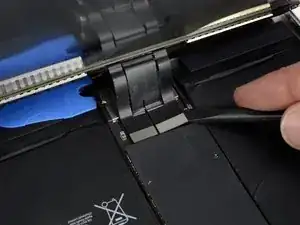
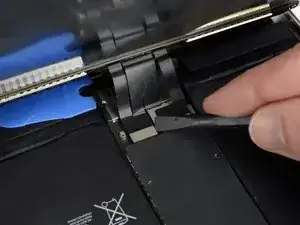
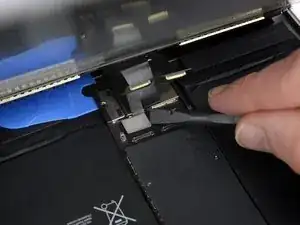
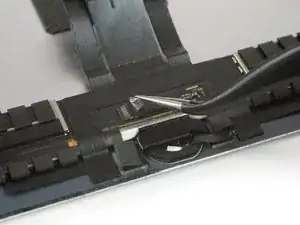
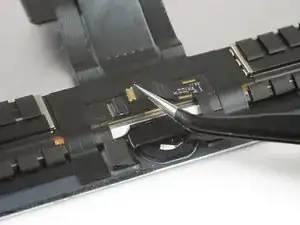
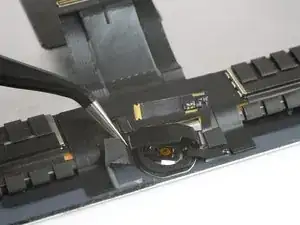
    • Usa un par de pinzas para despegar cualquier cinta que cubra el conector ZIF sobre el botón de inicio.

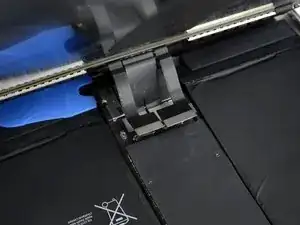
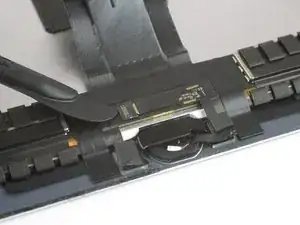
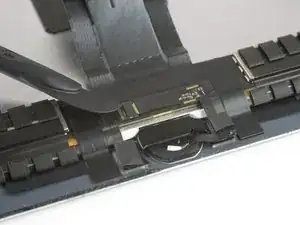
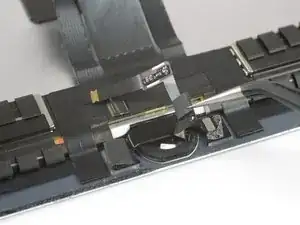
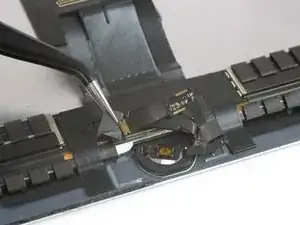
    • Usa la punta de un spudger, una herramienta de apertura o la uña para levantar la pequeña solapa de bloqueo con bisagras en el conector ZIF del cable del botón de inicio.

  19. nomU2VqbWTw6Cvrv
    nomU2VqbWTw6Cvrv
    loU2EOT5qUBi4G1R
    lrxspGmZ5jIthOQr
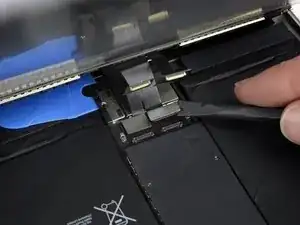
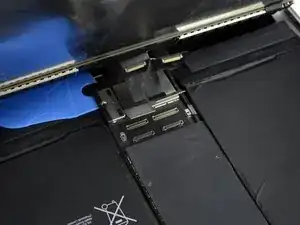
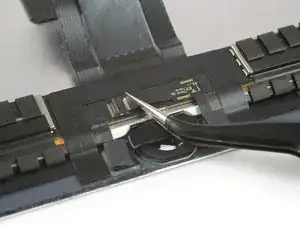
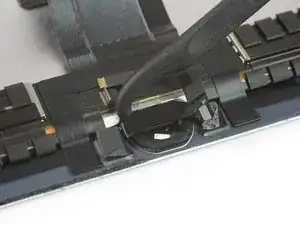
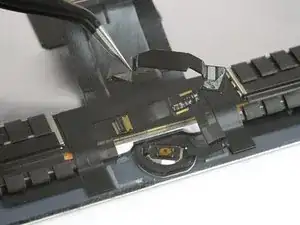
    • Usa un par de pinzas para sacar el cable flexible del botón de inicio directamente del conector ZIF.

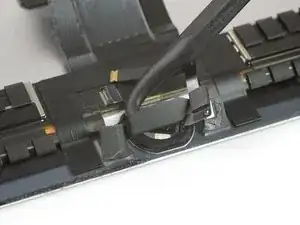
    • Retira con cuidado el cable flexible de la tapa del botón de inicio y dóblelo un poco hacia arriba.

    • Si es necesario, aplica más calor para ablandar el adhesivo debajo del cable flexible y facilitar su extracción de manera segura. El cable es muy frágil. Si se daña o si es necesario reemplazar el botón de inicio, Touch ID dejará de funcionar.

  20. kOO5BUP5LtvR1hak
    kOO5BUP5LtvR1hak
    hL2Bq3cLGnkyGGoE
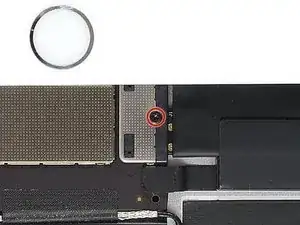
    • Levanta suavemente el soporte del botón de inicio insertando el gancho de un spudger de alabarda o el borde plano de un spudger normal debajo del soporte y haz palanca suavemente hacia el borde inferior del iPad.

    • El pegamento termofusible que sujeta este soporte en su lugar puede resultar rebelde. Aplica calor para que sea más fácil de separar y / o inserta con mucho cuidado una hoja de afeitar debajo del soporte para separarlo.

  21. 6bToGWR1K2NVsqYs
    6bToGWR1K2NVsqYs
    HbfOgqQu15nOYw5t
    juGdDnVtqjre3wFo
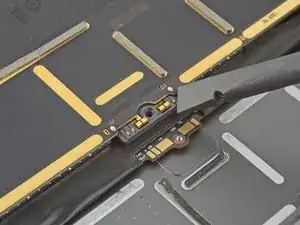
    • Levanta el soporte del botón de inicio comenzando por el lado izquierdo.

    • Tira con cuidado de él hacia la pantalla, asegurándose de no dañar el cable del botón de inicio.

    • Durante el reensamblaje, después de instalar el botón de inicio, deberás pegar este soporte en su lugar para asegurarlo.

    • Quita la mayor cantidad posible de residuos de adhesivo viejo y luego límpielo con acetona o alcohol isopropílico de alta concentración (90% o más).

    • Asegura el soporte con un pegamento de alta adherencia, super pegamento o cinta de doble cara de alta resistencia. Asegúrate de que el soporte esté alineado correctamente antes de permitir que se seque el adhesivo, o el botón de inicio no hará clic cuando se presione.

    • Puede ser necesario usar abrazaderas de tornillo de banco para sujetar el soporte del botón de inicio en su lugar mientras se seca el adhesivo.

    You cannot use Tesa or double side tape under bracket. There is some greater technique or material we need to use. I tried super glue even, though, I really not work what original clicking sounds. It happens almost all digital home button related all iPad. We need to strive to find its accurate solution.

    iRepairMan -

    Tesa tape works fine!

    DarrenG -

    What width/size Tesa tape (mm) do we require?

    Robert Lord -

    I ordered tesla tape without noticing the width and ended up with 2mm tape. I used three strips of it for this step, so 6mm would be perfect for the home button bracket. Having said that, the 2mm size is probably better if you need it for attaching the display, but I never needed it for that because I loved how the pre-cut adhesive strips in step 16 worked really well.

    hdh607 -

  22. Qu6Aha3emnAYriKD
    Qu6Aha3emnAYriKD
    aEEYptgLw6KXGwey
    PG4RXb2Y4bU3CjG4
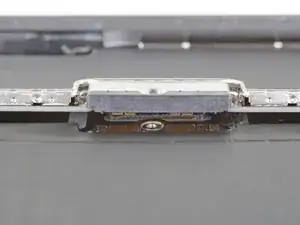
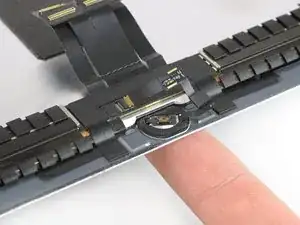
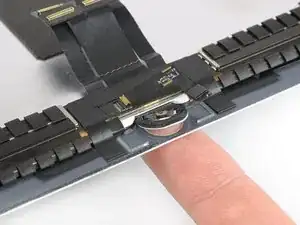
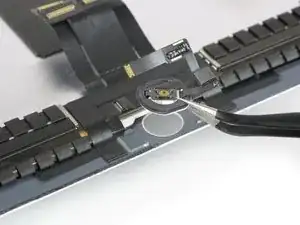
    • Usa la punta de su dedo para presionar el botón de inicio y empújalo suavemente desde la parte frontal de la pantalla.

    • Quita el botón de inicio.

    • Si tu pantalla estaba rota, ten especial cuidado de eliminar cualquier pequeño fragmento de vidrio del botón de inicio antes de transferirlo.

    • Durante el reensamblaje, transfiere la junta del botón de inicio a la nueva pantalla o al ensamblaje del botón de inicio.

    • Si es posible, encienda tu iPad y prueba tu reparación antes de instalar un adhesivo nuevo y volver a sellarlo.

    When we lift home button at very last stage, there is also ring/round plastic bracket that we need to peel off and re-attached to home button when transferring to the new display.

    iRepairMan -

    Do you glue the plastic ring on both sides , So is it glued to the lcd but also to the home button ?

    Hugo Lambrechtsen -

    Thanks for the tutorial, but it ends way to soon. The instructions on installing the new home button are vague, and there is nothing about when to remove the battery blocker or what adhesive is acceptable to use to reattach the screen. Would be great to see this tutorial cover everything from start to finish.

    Thomas -

    The responsive click is present, but does not have any function on the screen. Is there any correlation between the click and functionality, or did I maybe destroy the cable ?

    Arved -

    If it physically clicks but does not invoke any action then maybe the cable does not sit properly inside the ZIF-connector or the cable might be damaged. Try to re-connect and make sure it’s in the ZIF-connector all the way.

    Tobias Isakeit -

    I'v transferred a home button to a new screen and stuck it down with b-7000 adhesive. When I go to test and put the screen in place, I push the button but it seems to not stay stuck to the new screen. What should I do? I also have a white plastic ring that was part of the button. Should I have left it on there or remove it?

    Mikey Blackstone -

    I changed the LCD but now its completely dim.

    What might be the cause?

    choklet josi -

    Either the cable is not installed correctly or You have blown the backlit ic. You will have to send it for micro soldering to replace the chip. Always make sure you disconnect the battery before any repair is performed.

    Cellairis -

Conclusión

Compare su nueva pieza de repuesto con la pieza original. Es posible que deba transferir los componentes restantes o quitar los adhesivos de la pieza nueva antes de instalar.

Para volver a montar su dispositivo, siga esta guía en orden inverso.

Lleve sus desechos electrónicos a un reciclador certificado por R2 o e-Stewards.

¿La reparación no salió según lo planeado? Consulte nuestra Answers community para obtener ayuda para solucionar problemas.

Dominik Schnabelrauch

Miembro Desde 23/11/16

169012 Reputación

18 comentarios

Thank you so much it was clear and useful

harmaz25 -

Do you have any suggestions for replacement displays i need a good yet cheap one.

Nicholas Klose -

I’ve read the parts & tools lists multiple times, but I don’t see any mention of the new screen itself. Have I overlooked it?

Nicky -

Yup…. Looking for a new screen too…. Any suggestions would be appreciated :-)

RAVI M. -

Yes! Thanks for a great teardown!

John Steinklauber -

Thank you so much you made a difficult job a little easier.

Richard Dixson -

I have purchased the displays from Repair Parts Plus but the adhesive does not hold very good at all. I had one device returned to me because of this and I was able to pull the display off with no heat.

Before you say it, yes I did clean it, yes I clamped it overnight.

sunruh -

if i have to replace my broken screen and put a new one (its funcional but broken), why is it necessary to uninstall the home button??

Juan Diaz -

The home button is linked to the logic board. So when you have setup the Touch ID function you will have to use that home to keep the function. If you replace the home button you’ll loose Touch ID.

Tobias Isakeit -

Worked as described, I used the iopener and blow dryer to get the old display off. Please note, you might need help replacing the display connector cover bracket, very small screws and awkward position.

Tom McGrath -

Hi, I know that some apple products ad the latest Iphone are “blocked” reguardely the repair. I’m talking about the true tone issue or the block of the phone. Is in the ipad pro 10.5” any type of this issues ?

Giulio -

For uninstalling a broken screen , that was so clear, Can any one pls provide the steps to reinstall a new screen for iPad Pro 10.5.

If you kindly include the steps by using the iPad Pro 10.5 adhesive strip provided by ifixit.

thanks in advance

Ziad HAMMOUDEH -

Hi!

My iPad Pro 10.5 dies unexpectedly after a few minutes, This happened after changing the screen. I forgot to disconnect the battery when changing the screen

How do I fix it?

Ipad model: A1701

Seerwan Saadi -

I ordered a top condition used screen from iFixit and it was in really good shape! Awesome repair.

hdh607 -

I replaced the screen, with one that I’ve torn off from a used iPad of the same model A1701, But it won’t light up, I can update the software with MacOS Finder, and my AirPods still automatically connect to it, but the screen is black, no back-light, no dim image. What is happening?

Max Li -

You guys helped me save my 2017 iPad Pro 10.5 that I've had for 5 years. I'm so happy I don't have to toss this thing in the trash just because of a screen. Even happier that I don't have to pay new iPad money to replace it. Thanks so much ifixit homies. Much love.

j c -

Can I just replace digitizer?

Cesar Padilla -

The screws in steps 13 were hard to rescrew. The screw driver appeared to be too large. When doing the side removal of the glue if the wedge goes to far it will destroy the LCD screen. Ideally including the reassembly steps will be beneficial. Unfortunately for my case I was left with two broken screens.

Lyk Iordanid -